AWS Blog
New Network Load Balancer – Effortless Scaling to Millions of Requests per Second
 Elastic Load Balancing (ELB) has been an important part of AWS since 2009, when it was launched as part of a three-pack that also included Auto Scaling and Amazon CloudWatch. Since that time we have added many features, and also introduced the Application Load Balancer. Designed to support application-level, content-based routing to applications that run in containers, Application Load Balancers pair well with microservices, streaming, and real-time workloads.
Over the years, our customers have used ELB to support web sites and applications that run at almost any scale — from simple sites running on a T2 instance or two, all the way up to complex applications that run on large fleets of higher-end instances and handle massive amounts of traffic. Behind the scenes, ELB monitors traffic and automatically scales to meet demand. This process, which includes a generous buffer of headroom, has become quicker and more responsive over the years and works well even for our customers who use ELB to support live broadcasts, “flash” sales, and holidays. However, in some situations such as instantaneous fail-over between regions, or extremely spiky workloads, we have worked with our customers to pre-provision ELBs in anticipation of a traffic surge.
New Network Load Balancer
Today we are introducing the new Network Load Balancer (NLB). It is designed to handle tens of millions of requests per second while maintaining high throughput at ultra low latency, with no effort on your part. The Network Load Balancer is API-compatible with the Application Load Balancer, including full programmatic control of Target Groups and Targets. Here are some of the most important features:
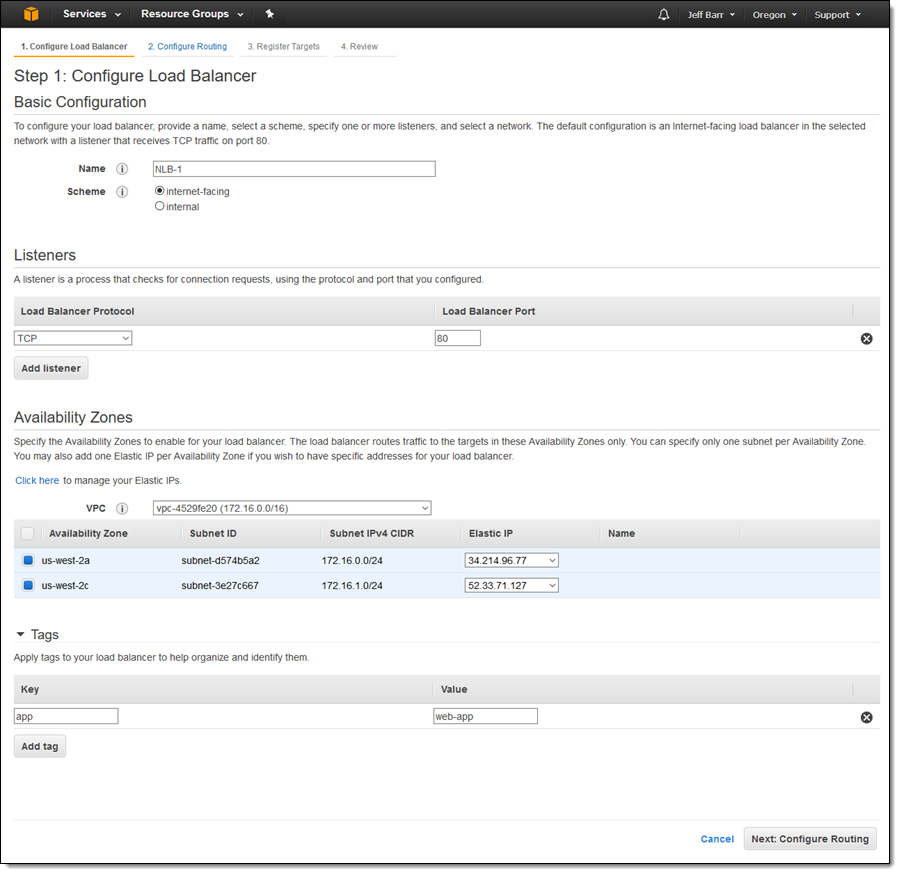
Static IP Addresses – Each Network Load Balancer provides a single IP address for each VPC subnet in its purview. If you have targets in a subnet in us-west-2a and other targets in a subnet in us-west-2c, NLB will create and manage two IP addresses (one per subnet); connections to that IP address will spread traffic across the instances in the subnet. You can also specify an existing Elastic IP for each subnet for even greater control. With full control over your IP addresses, Network Load Balancer can be used in situations where IP addresses need to be hard-coded into DNS records, customer firewall rules, and so forth.
Zonality – The IP-per-subnet feature reduces latency with improved performance, improves availability through isolation and fault tolerance and makes the use of Network Load Balancers transparent to your client applications. Network Load Balancers also attempt to route a series of requests from a particular source to targets in a single subnet while still allowing automatic failover.
Source Address Preservation – With Network Load Balancer, the original source IP address and source ports for the incoming connections remain unmodified, so application software need not support X-Forwarded-For, proxy protocol, or other workarounds. This also means that normal firewall rules, including VPC Security Groups, can be used on targets.
Long-running Connections – NLB handles connections with built-in fault tolerance, and can handle connections that are open for months or years, making them a great fit for IoT, gaming, and messaging applications.
Failover – Powered by Route 53 health checks, NLB supports failover between IP addresses within and across regions.
Creating a Network Load Balancer
I can create a Network Load Balancer opening up the EC2 Console, selecting Load Balancers, and clicking on Create Load Balancer:

I choose Network Load Balancer and click on Create, then enter the details. I can choose an Elastic IP address for each subnet in the target VPC and I can tag the Network Load Balancer:
Then I click on Configure Routing and create a new target group. I enter a name, and then choose the protocol and port. I can also set up health checks that go to the traffic port or to the alternate of my choice:

Then I click on Register Targets and the EC2 instances that will receive traffic, and click on Add to registered:

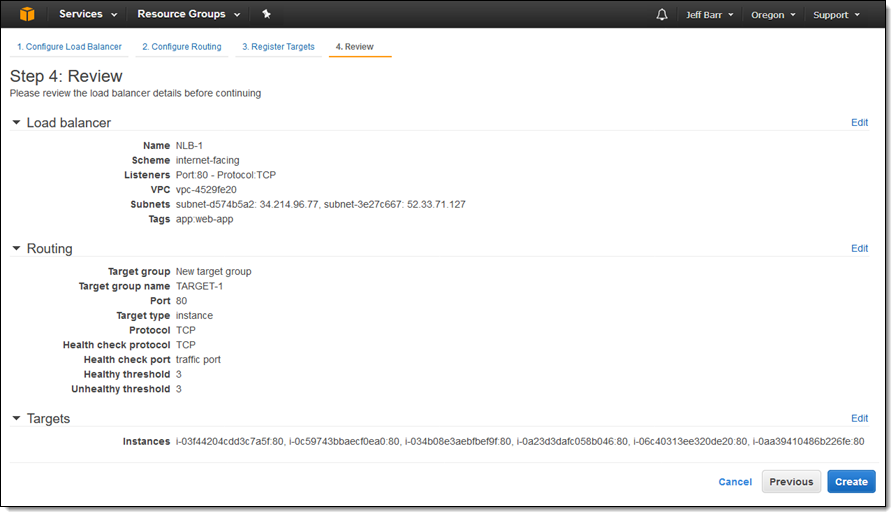
I make sure that everything looks good and then click on Create:
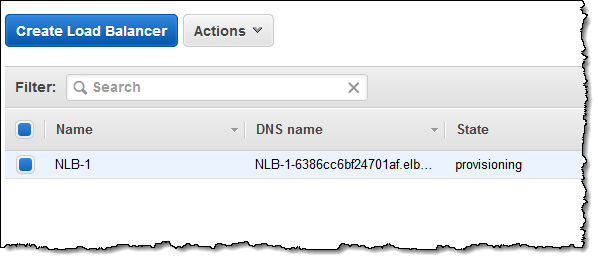
The state of my new Load Balancer is provisioning, switching to active within a minute or so:
For testing purposes, I simply grab the DNS name of the Load Balancer from the console (in practice I would use Amazon Route 53 and a more friendly name):

Then I sent it a ton of traffic (I intended to let it run for just a second or two but got distracted and it created a huge number of processes, so this was a happy accident):
$ while true;
> do
>   wget http://nlb-1-6386cc6bf24701af.elb.us-west-2.amazonaws.com/phpinfo2.php &
> done
A more disciplined test would use a tool like Bees with Machine Guns, of course!
I took a quick break to let some traffic flow and then checked the CloudWatch metrics for my Load Balancer, finding that it was able to handle the sudden onslaught of traffic with ease:

I also looked at my EC2 instances to see how they were faring under the load (really well, it turns out):

It turns out that my colleagues did run a more disciplined test than I did. They set up a Network Load Balancer and backed it with an Auto Scaled fleet of EC2 instances. They set up a second fleet composed of hundreds of EC2 instances, each running Bees with Machine Guns and configured to generate traffic with highly variable request and response sizes. Beginning at 1.5 million requests per second, they quickly turned the dial all the way up, reaching over 3 million requests per second and 30 Gbps of aggregate bandwidth before maxing out their test resources.
Choosing a Load Balancer
As always, you should consider the needs of your application when you choose a load balancer. Here are some guidelines:
Network Load Balancer (NLB) – Ideal for load balancing of TCP traffic, NLB is capable of handling millions of requests per second while maintaining ultra-low latencies. NLB is optimized to handle sudden and volatile traffic patterns while using a single static IP address per Availability Zone.
Application Load Balancer (ALB) – Ideal for advanced load balancing of HTTP and HTTPS traffic, ALB provides advanced request routing that supports modern application architectures, including microservices and container-based applications.
Classic Load Balancer (CLB) – Ideal for applications that were built within the EC2-Classic network.
For a side-by-side feature comparison, see the Elastic Load Balancer Details table.
If you are currently using a Classic Load Balancer and would like to migrate to a Network Load Balancer, take a look at our new Load Balancer Copy Utility. This Python tool will help you to create a Network Load Balancer with the same configuration as an existing Classic Load Balancer. It can also register your existing EC2 instances with the new load balancer.
Pricing & Availability
Like the Application Load Balancer, pricing is based on Load Balancer Capacity Units, or LCUs. Billing is $0.006 per LCU, based on the highest value seen across the following dimensions:
- Bandwidth – 1 GB per LCU.
- New Connections – 800 per LCU.
- Active Connections – 100,000 per LCU.
Most applications are bandwidth-bound and should see a cost reduction (for load balancing) of about 25% when compared to Application or Classic Load Balancers.
Network Load Balancers are available today in all AWS commercial regions except China (Beijing), supported by AWS CloudFormation, Auto Scaling, and Amazon ECS.
— Jeff;
AWS Online Tech Talks – September 2017
As a school supply aficionado, the month of September has always held a special place in my heart. Nothing sets the tone for success like getting a killer deal on pens and a crisp college ruled notebook. Even if back to school shopping trips have secured a seat in your distant memory, this is still a perfect time of year to stock up on office supplies and set aside some time for flexing those learning muscles. A great way to get started: scan through our September Tech Talks and check out the ones that pique your interest. This month we are covering re:Invent, AI, and much more.

September 2017 – Schedule
Noted below are the upcoming scheduled live, online technical sessions being held during the month of September. Make sure to register ahead of time so you won’t miss out on these free talks conducted by AWS subject matter experts.
Webinars featured this month are:
Monday, September 11
Databases
9:00 – 9:40 AM PDT: What’s New with Amazon DynamoDB
Serverless
10:30 – 11:10 AM PDT: Local Testing and Deployment Best Practices for Serverless Applications
Containers
12:00 – 12:40 PM PDT: Managing Secrets for Containers with Amazon ECS
Tuesday, September 12
re:Invent
9:00 – 9:40 AM PDT: Get Ready for re:Invent 2017 Content Overview
Mobile
10:30 – 11:10 AM PDT: Deep Dive on User Sign-up and Sign-in with Amazon Cognito
Management Tools
12:00 – 12:40 PM PDT: Using CloudTrail to Enhance Compliance and Governance of S3
Wednesday, September 13
Big Data
9:00 – 9:40 AM PDT: Best Practices for Processing Managed Hadoop Workloads
Databases
10:30 – 11:10 AM PDT: Migrating Your Oracle Database to PostgreSQL
DevOps
12:00 – 12:40 PM PDT: Configuration Management in the Cloud
Thursday, September 14
Big Data
9:00 – 9:40 AM PDT: Tackle Your Dark Data Challenge with AWS Glue
Databases
10:30 – 11:10 AM PDT: Deep Dive on MySQL Databases on AWS
Compute
12:00 – 12:40 PM PDT: Using AWS Batch and AWS Step Functions to Design and Run High-Throughput Workflows
Tuesday, September 26
AI
9:00 – 9:40 AM PDT: An Overview of AI on the AWS Platform
10:30 – 11:10 AM PDT: Introduction to Generative Adversarial Networks (GAN) with Apache MXNet
Storage
12:00 – 12:40 PM PDT: Revolutionizing Backup & Recovery Using Amazon S3
Enterprise
2:00 – 2:40 PM PDT: Securing Your Desktops with Amazon WorkSpaces
Wednesday, September 27
Security & Identity
9:00 – 9:40 AM PDT: Advanced DNS Traffic Management using Amazon Route 53
Storage
10:30 – 11:10 AM PDT: Deep Dive on Amazon EFS (with Encryption)
Hands on Lab
12:30 – 2:00 PM PDT: Hands on Lab: Windows Workloads
Thursday, September 28
Security & Identity
9:00 – 9:40 AM PDT: How to use AWS WAF to Mitigate OWASP Top 10 attacks
IoT
10:30 – 11:10 AM PDT: AWS Greengrass Technical Deep Dive with Demo
Hands on Lab
1:00 – 1:40 PM PDT: Design, Deploy, and Optimize SQL Server on AWS
The AWS Online Tech Talks series covers a broad range of topics at varying technical levels. These sessions feature live demonstrations & customer examples led by AWS engineers and Solution Architects. Check out the AWS YouTube channel for more on-demand webinars on AWS technologies.
– Sara
New – Application Load Balancing via IP Address to AWS & On-Premises Resources
I told you about the new AWS Application Load Balancer last year and showed you how to use it to do implement Layer 7 (application) routing to EC2 instances and to microservices running in containers.
Some of our customers are building hybrid applications as part of a longer-term move to AWS. These customers have told us that they would like to use a single Application Load Balancer to spread traffic across a combination of existing on-premises resources and new resources running in the AWS Cloud. Other customers would like to spread traffic to web or database servers that are scattered across two or more Virtual Private Clouds (VPCs), host multiple services on the same instance with distinct IP addresses but a common port number, and to offer support for IP-based virtual hosting for clients that do not support Server Name Indication (SNI). Another group of customers would like to host multiple instances of a service on the same instance (perhaps within containers), while using multiple interfaces and security groups to implement fine-grained access control.
These situations arise within a broad set of hybrid, migration, disaster recovery, and on-premises use cases and scenarios.
Route to IP Addresses
In order to address these use cases, Application Load Balancers can now route traffic directly to IP addresses. These addresses can be in the same VPC as the ALB, a peer VPC in the same region, on an EC2 instance connected to a VPC by way of ClassicLink, or on on-premises resources at the other end of a VPN connection or AWS Direct Connect connection.
Application Load Balancers already group targets in to target groups. As part of today’s launch, each target group now has a target type attribute:
 instance – Targets are registered by way of EC2 instance IDs, as before.
ip – Targets are registered as IP addresses. You can use any IPv4 address from the load balancer’s VPC CIDR for targets within load balancer’s VPC and any IPv4 address from the RFC 1918 ranges (10.0.0.0/8, 172.16.0.0/12, and 192.168.0.0/16) or the RFC 6598 range (100.64.0.0/10) for targets located outside the load balancer’s VPC (this includes Peered VPC, EC2-Classic, and on-premises targets reachable over Direct Connect or VPN).
Each target group has a load balancer and health check configuration, and publishes metrics to CloudWatch, as has always been the case.
Let’s say that you are in the transition phase of an application migration to AWS or want to use AWS to augment on-premises resources with EC2 instances and you need to distribute application traffic across both your AWS and on-premises resources. You can achieve this by registering all the resources (AWS and on-premises) to the same target group and associate the target group with a load balancer. Alternatively, you can use DNS based weighted load balancing across AWS and on-premises resources using two load balancers i.e. one load balancer for AWS and other for on-premises resources. In the scenario where application-A back-ends are in VPC and application-B back-ends are in on-premises locations then you can put back-ends for each application in different target groups and use content based routing to route traffic to each target group.
Creating a Target Group
Here’s how I create a target group that sends traffic to some IP addresses as part of the process of creating an Application Load Balancer. I enter a name (ip-target-1) and select ip as the Target type:

Then I enter IP address targets. These can be from the VPC that hosts the load balancer:

Or they can be other private IP addresses within one of the private ranges listed above, for targets outside of the VPC that hosts the load balancer:

After I review the settings and create the load balancer, traffic will be sent to the designated IP addresses as soon as they pass the health checks. Each load balancer can accommodate up to 1000 targets.
I can examine my target group and edit the set of targets at any time:

As you can see, one of my targets was not healthy when I took this screen shot (this was by design). Metrics are published to CloudWatch for each target group; I can see them in the Console and I can create CloudWatch Alarms:

Available Now
This feature is available now and you can start using it today in all AWS Regions.
— Jeff;
AWS Hot Startups – August 2017
There’s no doubt about it – Artificial Intelligence is changing the world and how it operates. Across industries, organizations from startups to Fortune 500s are embracing AI to develop new products, services, and opportunities that are more efficient and accessible for their consumers. From driverless cars to better preventative healthcare to smart home devices, AI is driving innovation at a fast rate and will continue to play a more important role in our everyday lives.
This month we’d like to highlight startups using AI solutions to help companies grow. We are pleased to feature:
- SignalBox – a simple and accessible deep learning platform to help businesses get started with AI.
- Valossa – an AI video recognition platform for the media and entertainment industry.
- Kaliber – innovative applications for businesses using facial recognition, deep learning, and big data.
SignalBox (UK)![]()
In 2016, SignalBox founder Alain Richardt was hearing the same comments being made by developers, data scientists, and business leaders. They wanted to get into deep learning but didn’t know where to start. Alain saw an opportunity to commodify and apply deep learning by providing a platform that does the heavy lifting with an easy-to-use web interface, blueprints for common tasks, and just a single-click to productize the models. With SignalBox, companies can start building deep learning models with no coding at all – they just select a data set, choose a network architecture, and go. SignalBox also offers step-by-step tutorials, tips and tricks from industry experts, and consulting services for customers that want an end-to-end AI solution.
SignalBox offers a variety of solutions that are being used across many industries for energy modeling, fraud detection, customer segmentation, insurance risk modeling, inventory prediction, real estate prediction, and more. Existing data science teams are using SignalBox to accelerate their innovation cycle. One innovative UK startup, Energi Mine, recently worked with SignalBox to develop deep networks that predict anomalous energy consumption patterns and do time series predictions on energy usage for businesses with hundreds of sites.
SignalBox uses a variety of AWS services including Amazon EC2, Amazon VPC, Amazon Elastic Block Store, and Amazon S3. The ability to rapidly provision EC2 GPU instances has been a critical factor in their success – both in terms of keeping their operational expenses low, as well as speed to market. The Amazon API Gateway has allowed for operational automation, giving SignalBox the ability to control its infrastructure.
To learn more about SignalBox, visit here.
Valossa (Finland)![]()
As students at the University of Oulu in Finland, the Valossa founders spent years doing research in the computer science and AI labs. During that time, the team witnessed how the world was moving beyond text, with video playing a greater role in day-to-day communication. This spawned an idea to use technology to automatically understand what an audience is viewing and share that information with a global network of content producers. Since 2015, Valossa has been building next generation AI applications to benefit the media and entertainment industry and is moving beyond the capabilities of traditional visual recognition systems.
Valossa’s AI is capable of analyzing any video stream. The AI studies a vast array of data within videos and converts that information into descriptive tags, categories, and overviews automatically. Basically, it sees, hears, and understands videos like a human does. The Valossa AI can detect people, visual and auditory concepts, key speech elements, and labels explicit content to make moderating and filtering content simpler. Valossa’s solutions are designed to provide value for the content production workflow, from media asset management to end-user applications for content discovery. AI-annotated content allows online viewers to jump directly to their favorite scenes or search specific topics and actors within a video.
Valossa leverages AWS to deliver the industry’s first complete AI video recognition platform. Using Amazon EC2 GPU instances, Valossa can easily scale their computation capacity based on customer activity. High-volume video processing with GPU instances provides the necessary speed for time-sensitive workflows. The geo-located Availability Zones in EC2 allow Valossa to bring resources close to their customers to minimize network delays. Valossa also uses Amazon S3 for video ingestion and to provide end-user video analytics, which makes managing and accessing media data easy and highly scalable.
To see how Valossa works, check out www.WhatIsMyMovie.com or enable the Alexa Skill, Valossa Movie Finder. To try the Valossa AI, sign up for free at www.valossa.com.
Kaliber (San Francisco, CA)
Serial entrepreneurs Ray Rahman and Risto Haukioja founded Kaliber in 2016. The pair had previously worked in startups building smart cities and online privacy tools, and teamed up to bring AI to the workplace and change the hospitality industry. Our world is designed to appeal to our senses – stores and warehouses have clearly marked aisles, products are colorfully packaged, and we use these designs to differentiate one thing from another. We tell each other apart by our faces, and previously that was something only humans could measure or act upon. Kaliber is using facial recognition, deep learning, and big data to create solutions for business use. Markets and companies that aren’t typically associated with cutting-edge technology will be able to use their existing camera infrastructure in a whole new way, making them more efficient and better able to serve their customers.
Computer video processing is rapidly expanding, and Kaliber believes that video recognition will extend to far more than security cameras and robots. Using the clients’ network of in-house cameras, Kaliber’s platform extracts key data points and maps them to actionable insights using their machine learning (ML) algorithm. Dashboards connect users to the client’s BI tools via the Kaliber enterprise APIs, and managers can view these analytics to improve their real-world processes, taking immediate corrective action with real-time alerts. Kaliber’s Real Metrics are aimed at combining the power of image recognition with ML to ultimately provide a more meaningful experience for all.
Kaliber uses many AWS services, including Amazon Rekognition, Amazon Kinesis, AWS Lambda, Amazon EC2 GPU instances, and Amazon S3. These services have been instrumental in helping Kaliber meet the needs of enterprise customers in record time.
Learn more about Kaliber here.
—
Thanks for reading and we’ll see you next month!
-Tina
New – Descriptions for Security Group Rules
I’m often impressed when I look back to the early days of EC2 and see just how many features from the launch have survived until today. AMIs, Availability Zones, KeyPairs, Security Groups, and Security Group Rules were all present at the beginning, as was pay-as-you-go usage. Even though we have made innumerable additions to the service in the past eleven years, the fundamentals formed a strong base and are still prominent today.
We put security first from the get-go, and gave you the ability to use Security Groups and Security Group Rules to exercise fine-grained control over the traffic that flows to and from to your instances. Our customers make extensive use of this feature, with large collections of groups and even larger collections of rules.
There was, however, one problem! While each group had an associated description (“Production Web Server Access”, “Development Access”, and so forth), the individual rules did not. Some of our larger customers created external tracking systems to ensure that they captured the intent behind each rule. This was tedious and error prone, and now it is unnecessary!
Descriptions for Security Group Rules
You can now add descriptive text to each of your Security Group Rules! This will simplify your operations and remove some opportunities for operator error. Descriptions can be up to 255 characters long and can be set and viewed from the AWS Management Console, AWS Command Line Interface (CLI), and the AWS APIs. You can enter a description when you create a new rule and you can edit descriptions for existing rules.
Here’s how I can enter descriptions when creating a new Security Group (Of course, allowing SSH access from arbitrary IP addresses is not a best practice):

I can select my Security Group and review all of the descriptions:

I can also click on the Edit button to modify the rules and the descriptions.
From the CLI I can include a description when I use the authorize-security-group-ingress and authorize-security-group-egress commands. I can use update-security-group-rule-descriptions-ingress and update-security-group-rule-descriptions-egress to change an existing description, and describe-security-groups to see the descriptions for each rule.
This feature is available now and you can start using it today in all commercial AWS Regions. It works for VPC Security Groups and for EC2 Classic Security Groups. CloudFormation support is on the way!
— Jeff;
Deadline 10 – Launch a Rendering Fleet in AWS
Graphical rendering is a compute-intensive task that is, as they say, embarrassingly parallel. Looked at another way, this means that there’s a more or less linear relationship between the number of processors that are working on the problem and the overall wall-clock time that it takes to complete the task. In a creative endeavor such as movie-making, getting the results faster spurs creativity, improves the feedback loop, gives you time to make more iterations and trials, and leads to a better result. Even if you have a render farm in-house, you may still want to turn to the cloud in order to gain access to more compute power at peak times. Once you do this, the next challenge is to manage the combination of in-house resources, cloud resources, and the digital assets in a unified fashion.
Deadline 10
Earlier this week we launched Deadline 10, a powerful render management system. Building on technology that we brought on board with the acquisition of Thinkbox Software, Deadline 10 is designed to extend existing on-premises rendering into the AWS Cloud, giving you elasticity and flexibility while remaining simple and easy to use. You can set up and manage large-scale distributed jobs that span multiple AWS regions and benefit from elastic, usage-based AWS licensing for popular applications like Deadline for Autodesk 3ds Max, Maya, Arnold, and dozens more, all available from the Thinkbox Marketplace. You can purchase software licenses from the marketplace, use your existing licenses, or use them together.
Deadline 10 obtains cloud-based compute resources by managing bids for EC2 Spot Instances, providing you with access to enough low-cost compute capacity to let your imagination run wild! It uses your existing AWS account, tags EC2 instances for tracking, and synchronizes your local assets to the cloud before rendering begins.
A Quick Tour
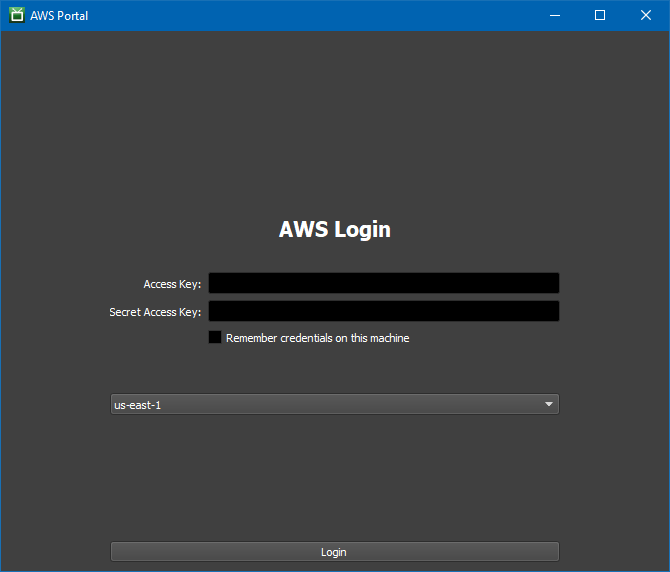
Let’s take a quick tour of Deadline 10 and see how it makes use of AWS. The AWS Portal is available from the View menu:

The first step is to log in to my AWS account:
Then I configure the connection server, license server, and the S3 bucket that will be used to store rendering assets:

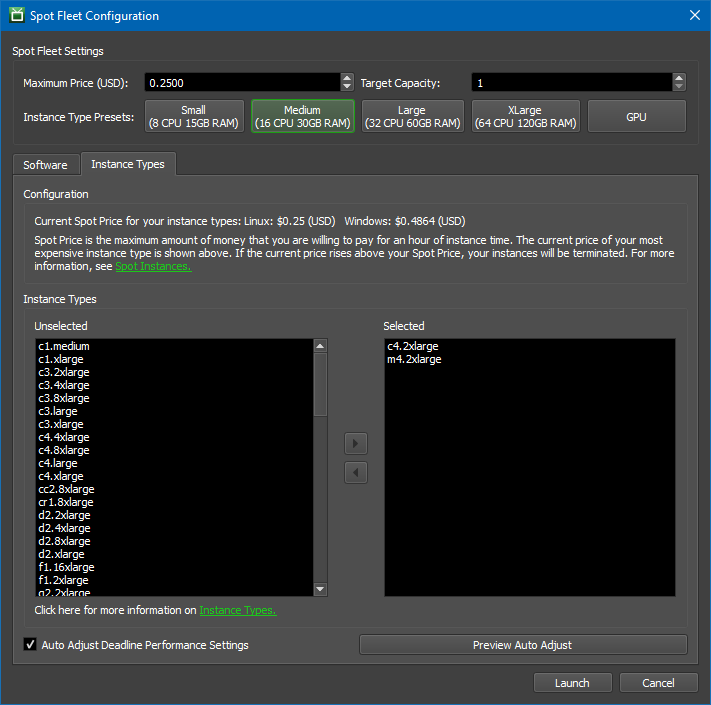
Next, I set up my Spot fleet, establishing a maximum price per hour for each EC2 instance, setting target capacity, and choosing the desired rendering application:

I can also choose any desired combination of EC2 instance types:
When I am ready to render I click on Start Spot Fleet:

This will initiate the process of bidding for and managing Spot Instances. The running instances are visible from the Portal:

I can monitor the progress of my rendering pipeline:

I can stop my Spot fleet when I no longer need it:

Deadline 10 is now available for usage based license customers; a new license is needed for traditional floating license users. Pricing for yearly Deadline licenses has been reduced to $48 annually. If you are already using an earlier version of Deadline, feel free to contact us to learn more about licensing options.
— Jeff;
Amazon Aurora Fast Database Cloning
Today, I want to quickly show off a feature of Amazon Aurora that I find incredibly useful: Fast Database Cloning. By taking advantage of Aurora’s underlying distributed storage engine you’re able to quickly and cheaply create a copy-on-write clone of your database.
In my career I’ve frequently spent time waiting on some representative sample of data to use in development, experiments, or analytics. If I had a 2TB database it could take hours just waiting for a copy of the data to be ready before I could peform my tasks. Even within RDS MySQL, I would still have to wait several hours for a snapshot copy to complete before I was able to test a schema migration or perform some analytics. Aurora solves this problem in a very interesting way.
The distributed storage engine for Aurora allows us to do things which are normally not feasible or cost-effective with a traditional database engine. By creating pointers to individual pages of data the storage engine enables fast database cloning. Then, when you make changes to the data in the source or the clone, a copy-on-write protocol creates a new copy of that page and updates the pointers. This means my 2TB snapshot restore job that used to take an hour is now ready in about 5 minutes – and most of that time is spent provisioning a new RDS instance.
The time it takes to create the clone is independent of the size of the database since we’re pointing at the same storage. It also makes cloning a very cost-effective operation since I only pay storage costs for the changed pages instead of an entire copy. The database clone is still a regular Aurora Database Cluster with all the same durability guarentees.

Let’s clone a database. First, I’ll select an Aurora (MySQL) instance and select “create-clone” from the Instance Actions.

Next I’ll name our clone dolly-the-sheep and provision it.

It took about 5 minutes and 30 seconds for my clone to become available and I started making some large schema changes and saw no performance impact. The schema changes themselves completed faster than they would have on traditional MySQL due to improvements the Aurora team made to enable faster DDL operations. I could subsequently create a clone-of-a-clone or even a clone-of-a-clone-of-a-clone (and so on) if I wanted to have another team member perform some tests on my schema changes while I continued to make changes of my own. It’s important to note here that clones are first class databases from the perspective of RDS. I still have all of the features that every other Aurora database supports: snapshots, backups, monitoring and more.
I hope this feature will allow you and your teams to save a lot of time and money on experimenting and developing applications based on Amazon Aurora. You can read more about this feature in the Amazon Aurora User Guide and I strongly suggest following the AWS Database Blog. Anurag Gupta’s posts on quorums and Amazon Aurora storage are particularly interesting.
Have follow-up questions or feedback? Ping us at aurora-pm@amazon.com, or leave a comment here. We’d love to get your thoughts and suggestions.
– Randall
New – Amazon EC2 Elastic GPUs for Windows
Today we’re excited to announce the general availability of Amazon EC2 Elastic GPUs for Windows. An Elastic GPU is a GPU resource that you can attach to your Amazon Elastic Compute Cloud (EC2) instance to accelerate the graphics performance of your applications. Elastic GPUs come in medium (1GB), large (2GB), xlarge (4GB), and 2xlarge (8GB) sizes and are lower cost alternatives to using GPU instance types like G3 or G2 (for OpenGL 3.3 applications). You can use Elastic GPUs with many instance types allowing you the flexibility to choose the right compute, memory, and storage balance for your application. Today you can provision elastic GPUs in US East (Northern Virginia) and US East (Ohio).
Elastic GPUs start at just $0.05 per hour for an eg1.medium. A nickel an hour. If we attach that Elastic GPU to a t2.medium ($0.065/hour) we pay a total of less than 12 cents per hour for an instance with a GPU. Previously, the cheapest graphical workstation (G2/3 class) cost 76 cents per hour. That’s over an 80% reduction in the price for running certain graphical workloads.
When should I use Elastic GPUs?
Elastic GPUs are best suited for applications that require a small or intermittent amount of additional GPU power for graphics acceleration and support OpenGL. Elastic GPUs support up to and including the OpenGL 3.3 API standards with expanded API support coming soon.
Elastic GPUs are not part of the hardware of your instance. Instead they’re attached through an elastic GPU network interface in your subnet which is created when you launch an instance with an Elastic GPU. The image below shows how Elastic GPUs are attached.

Since Elastic GPUs are network attached it’s important to provision an instance with adequate network bandwidth to support your application. It’s also important to make sure your instance security group allows traffic on port 2007.
Any application that can use the OpenGL APIs can take advantage of Elastic GPUs so Blender, Google Earth, SIEMENS SolidEdge, and more could all run with Elastic GPUs. Even Kerbal Space Program!
Ok, now that we know when to use Elastic GPUs and how they work, let’s launch an instance and use one.
Using Elastic GPUs
First, we’ll navigate to the EC2 console and click Launch Instance. Next we’ll select a Windows AMI like: “Microsoft Windows Server 2016 Base”. Then we’ll select an instance type. Then we’ll make sure we select the “Elastic GPU” section and allocate an eg1.medium (1GB) Elastic GPU.
We’ll also include some userdata in the advanced details section. We’ll write a quick PowerShell script to download and install our Elastic GPU software.
Start-Transcript -Path "C:\egpu_install.log" -Append
(new-object net.webclient).DownloadFile('http://ec2-elasticgpus.s3-website-us-east-1.amazonaws.com/latest', 'C:\egpu.msi')
Start-Process "msiexec.exe" -Wait -ArgumentList "/i C:\egpu.msi /qn /L*v C:\egpu_msi_install.log"
[Environment]::SetEnvironmentVariable("Path", $env:Path + ";C:\Program Files\Amazon\EC2ElasticGPUs\manager\", [EnvironmentVariableTarget]::Machine)
Restart-Computer -Force
This software sends all OpenGL API calls to the attached Elastic GPU.
Next, we’ll double check to make sure my security group has TCP port 2007 exposed to my VPC so my Elastic GPU can connect to my instance. Finally, we’ll click launch and wait for my instance and Elastic GPU to provision. The best way to do this is to create a separate SG that you can attach to the instance.

You can see an animation of the launch procedure below.

Alternatively we could have launched on the AWS CLI with a quick call like this:
$aws ec2 run-instances --elastic-gpu-specification Type=eg1.2xlarge \
--image-id ami-1a2b3c4d \
--subnet subnet-11223344 \
--instance-type r4.large \
--security-groups "default" "elasticgpu-sg"
then we could have followed the Elastic GPU software installation instructions here.
We can now see our Elastic GPU is humming along and attached by checking out the Elastic GPU status in the taskbar.

We welcome any feedback on the service and you can click on the Feedback link in the bottom left corner of the GPU Status Box to let us know about your experience with Elastic GPUs.
Elastic GPU Demonstration
Ok, so we have our instance provisioned and our Elastic GPU attached. My teammates here at AWS wanted me to talk about the amazingly wonderful 3D applications you can run, but when I learned about Elastic GPUs the first thing that came to mind was Kerbal Space Program (KSP), so I’m going to run a quick test with that. After all, if you can’t launch Jebediah Kerman into space then what was the point of all of that software? I’ve downloaded KSP and added the launch parameter of -force-opengl to make sure we’re using OpenGL to do our rendering. Below you can see my poor attempt at building a spaceship – I used to build better ones. It looks pretty smooth considering we’re going over a network with a lossy remote desktop protocol.

I’d show a picture of the rocket launch but I didn’t even make it off the ground before I experienced a rapid unscheduled disassembly of the rocket. Back to the drawing board for me.
In the mean time I can check my Amazon CloudWatch metrics and see how much GPU memory I used during my brief game.

Partners, Pricing, and Documentation
To continue to build out great experiences for our customers, our 3D software partners like ANSYS and Siemens are looking to take advantage of the OpenGL APIs on Elastic GPUs, and are currently certifying Elastic GPUs for their software. You can learn more about our partnerships here.
You can find information on Elastic GPU pricing here. You can find additional documentation here.
Now, if you’ll excuse me I have some virtual rockets to build.
– Randall
VMware Cloud on AWS – Now Available
Last year I told you about the work that we are doing with our friends at VMware to build the VMware Cloud on AWS. As I shared at the time, this is a native, fully-managed offering that runs the VMware SDDC stack directly on bare-metal AWS infrastructure that maintains the elasticity and security customers have come to expect. This allows you to benefit from the scalability and resiliency of AWS, along with the networking and system-level hardware features that are fundamental parts of our security-first architecture.
VMware Cloud on AWS allows you take advantage of what you already know and own. Your existing skills, your investment in training, your operational practices, and your investment in software licenses remain relevant and applicable when you move to the public cloud. As part of that move you can forget about building & running data centers, modernizing hardware, and scaling to meet transient or short-term demand. You can also take advantage of a long list of AWS compute, database, analytics, IoT, AI, security, mobile, deployment and application services.
Initial Availability
After incorporating feedback from many customers and partners in our Early Access beta program, today at VMworld, VMware and Amazon announced the initial availability of VMware Cloud on AWS. This service is initially available in the US West (Oregon) region through VMware and members of the VMware Partner Network. It is designed to support popular use cases such as data center extension, application development & testing, and application migration.
This offering is sold, delivered, supported, and billed by VMware. It supports custom-sized VMs, runs any OS that is supported by VMware, and makes use of single-tenant bare-metal AWS infrastructure so that you can bring your Windows Server licenses to the cloud. Each SDDC (Software-Defined Data Center) consists of 4 to 16 instances, each with 36 cores, 512 GB of memory, and 15.2 TB of NVMe storage. Clusters currently run in a single AWS Availability Zone (AZ) with support in the works for clusters that span AZs. You can spin up an entire VMware SDDC in a couple of hours, and scale host capacity up and down in minutes.
The NSX networking platform (powered by the AWS Elastic Networking Adapter running at up to 25 Gbps) supports multicast traffic, separate networks for management and compute, and IPSec VPN tunnels to on-premises firewalls, routers, and so forth.
Here’s an overview to show you how all of the parts fit together:

The VMware and third-party management tools (vCenter Server, PowerCLI, the vRealize Suite, and code that calls the vSphere API) that you use today will work just fine when you build a hybrid VMware environment that combines your existing on-premises resources and those that you launch in AWS. This hybrid environment will use a new VMware Hybrid Linked Mode to create a single, unified view of your on-premises and cloud resources. You can use familiar VMware tools to manage your applications, without having to purchase any new or custom hardware, rewrite applications, or modify your operating model.
Your applications and your code can access the full range of AWS services (the database, analytical, and AI services are a good place to start). Use for these services is billed separately and you’ll need to create an AWS account.
Learn More at VMworld
If you are attending VMworld in Las Vegas, please be sure to check out some of the 90+ AWS sessions:
- AWS 101.
- VMware Cloud on AWS – The Painless Path to Hybrid Cloud.
- VMware Cloud on AWS: Hybrid Cloud Architectural Deep Dive: Networking and Storage Best Practices.
- AWS Native Services Integration with VMware Cloud on AWS: Technical Deep Dive.
- Delivering Hybrid Cloud Architectures for Your Customers with VMware Cloud on AWS.
Also, be sure to stop by booth #300 and say hello to my colleagues from the AWS team.
In the Works
Our teams have come a long way since last year, but things are just getting revved up!
VMware and AWS are continuing to invest to enable support for new capabilities and use cases, such as application migration, data center expansion, and application test and development. Work is under way to add additional AWS regions, support more use cases such as disaster recovery and data center consolidation, add certifications, and enable even deeper integration with AWS services.
— Jeff;
Launch – Amazon Cognito User Pools General Availability: App Integration and Federation
Recently I was reading articles on Forbes.com, as well as, some other tech-focused websites around mobile user experience, engagement, and development. Almost every article, it mentions that the success of a mobile app development project is dependent upon the delivery of a well-designed user onboarding experience and an engaging mobile interface. An Inc.com article states that over 90% of all downloaded apps used only once and then removed. The number 3 reason noted for users deleting mobile applications from their devices was a poor user experience and interface design. In addition, a subsequent article shares that one of the rules of mobile application engagement is to “Focus on quick wins during onboarding”.
Implementing a smooth mobile user experience is not easy, and I speak from experience as a developer who has built many mobile apps where each time I have struggled to build the user interface of the mobile application. Since identity is mission critical for applications, and it is usually the first entry point when onboarding users onto most mobile and web applications to present these capabilities in a fluid and seamless user interface. Therefore, I am exultant over AWS Cognito User Pools – App Integration and Federation and thrilled to announce the general availability of this new service feature.
Just in case you have not taken advantage of Amazon Cognito as of yet, let me introduce you to the service. Amazon Cognito is a managed cloud service that allows you to add authentication, authorization, and user management to your web, mobile and even IoT applications.
Amazon Cognito features consists of:
- Amazon Cognito User Pools: create and maintain a user directory in order to add sign-up and sign-in to your mobile app or web application. You can also sign in users to a user pool through social identity providers as well as, SAML-based providers
- Amazon Cognito Federated Identities: enables the creation of unique identities for users and the ability to authenticate them with federated identity providers, such as Google or Facebook, for temporary, limited-privilege access to app resources
- Amazon Cognito Sync: allows you to synchronize user profile data across mobile devices and the web without the need to build a backend. It supports offline access, cross-device synchronizing, and local data caching of application-related user data so the user app experience remains consistent regardless of the device.
With the General Availability of Amazon Cognito User Pools – App Integration and Federation, we are now adding AWS-hosted user sign-up and sign-in UI pages to help web and mobile app developers effortlessly integrate and customize the onboarding user experience for their applications. In addition, when using the Cognito User pools user directory, you can enhance your mobile client login capabilities by providing a sign-up and sign-in for social identity providers including Facebook, Google, Login with Amazon, as well as through SAML with corporate identity providers such as Microsoft Active Directory.

The aspects of the Amazon Cognito User Pools – App Integration and Federation service features provided in this GA release are as follows:
| App Integration with User Pools | |
| Provide a hosted UI for sign up, sign in, forgot password, etc. | Provide a New WebView for Mobile clients |
| Developers can customize the hosted UI to match their style and branding | Enables usage of Custom logo and CSS styles |
| Federation with User Pools | |
| Cognito handles interactions with identity providers to authenticate users and receive tokens | Identity providers are configured in Cognito Ex. SAML metadata document, issuer URL, identifiers, and domains |
| Cognito User Pools act as a universal directory providing user profiles and authentication tokens for federated and “Cognito service users | Supporting Identity Providers: SAML, Facebook, Google, and Amazon |
| OAuth 2.0 Support | |
| Cognito supports OAuth 2.0 as Industry standard protocol for authorization | OAuth 2.0 Permissions are defined as “scopes” Ex. permission to read a user profile or edit photos |
| Client apps can request a set of scopes, and if permitted, get back an access token with those scopes Ex. If the request is in the context of a user, the user can be authenticated | Client apps take the access token to a resource server to access the resources as permitted by the scopes |
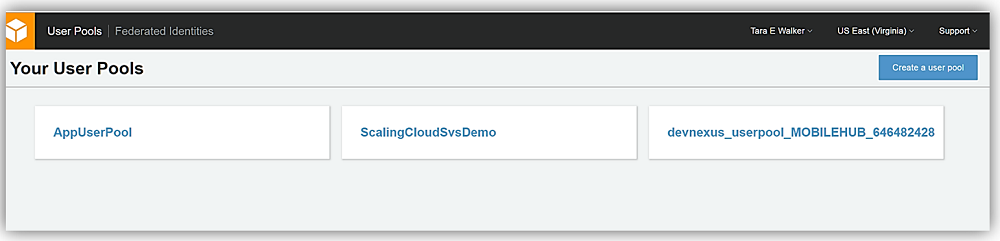
Since I can’t wait to try out these new features, let’s build a quick app using the new Cognito User Pool App Integration and Federation features. Therefore, off to the Cognito management console we go. Once in the console, I’ll quickly create a User Pool for our test by clicking the Manage your User Pools button.

Once in the User Pools console, I’ll click the Create a user pool button. Once in the Create a user pool screen, I’ll name my new user pool, TaraCognitoGAPool, and since I want to customize my hosted UI and take advantage of the other new features, I opt for creating my pool by selecting the Step Through the Settings button to complete the creation of my user pool.

On the Attributes tab, I have two sign-in options for my users; they can sign in via Username and I can additionally grant the user multiple alternatives of how to log into my application. The other option is to allow the user to make use of their Email address or phone number to sign in and I can provide them the ability to use both options or ensure only one of the aforementioned methods are used. Usually, I opt for the user to use Username with email, but since we are testing out the new features of App Integration and Federation today, I am going to select Email address or phone number and only allow the use of email addresses for sign-in/sign-up.

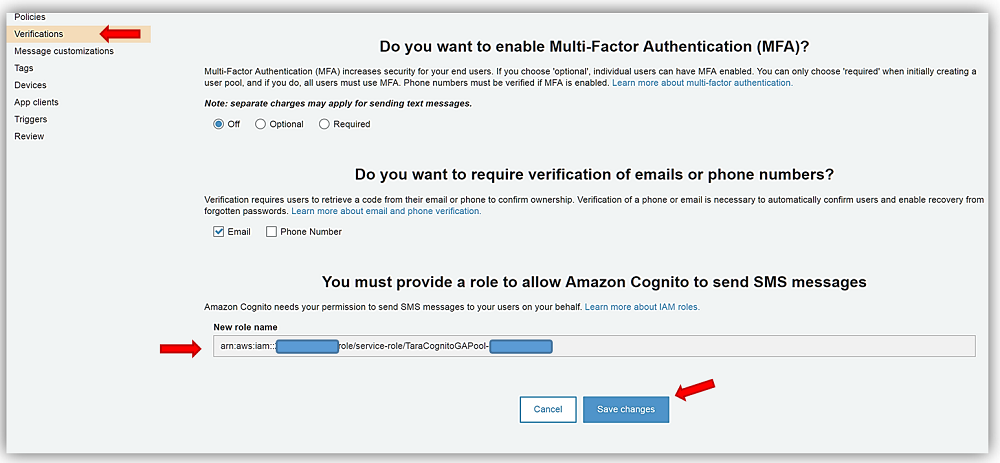
Next stop is the Policies and the Verifications tabs for which I will keep all of the default options selected on both of the tabs. On the Verification tab, however, I do want to provide the option for Cognito to send SMS messages on my behalf. Therefore, I will choose the Create Role button and allow an IAM role to be created granting SMS permissions. I complete the selection of options for my user pool options by clicking Save Changes button.


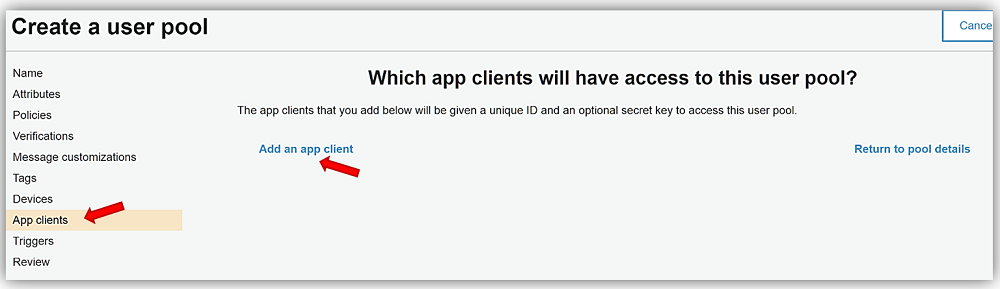
The last step is to go to the App clients tab and create an app client by clicking the Add an app client link on the page. I’ll name my app client, TaraCognitoGA-App, leave all the default options the same, and click the Create app client button.


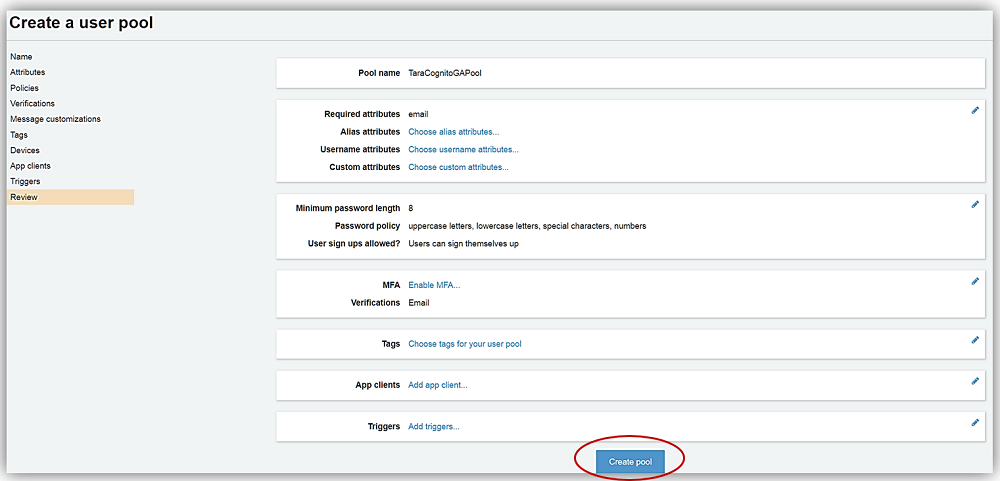
All that is left is to review the TaraCognitoGAPool options and click Create pool button.
Great! Now that my user pool, TaraCognitoGAPool has been created. I can take advantage of the new App Integration and Federation features. If you have created a user pool before, you will notice that the user pool screen now contains tabs for the new user pools features in the menu side bar.
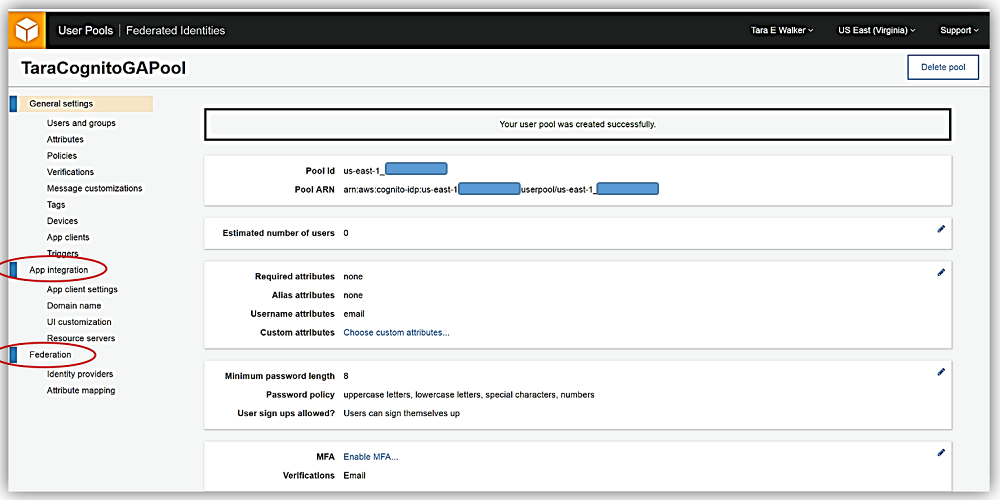
This is what we’ve been waiting for. Now I will go into App integration tab in order to configure settings to have my own customized, built-in UI for signing up and signing in users to my TaraCognitoGA-App.
First I’ll go into my App client settings under the App Integration tab. Here I will enable the identity providers I want to allow users of my application to use when signing in. Since I have only enabled Cognito User Pools as an identity provider, it is currently the only identity provider option. If I want to allow users to sign in with external identity providers like Facebook or a SAML provider I will have to configure them with Federation. We’ll discuss this shortly.
For now, I’ll enter the callback URL that my app should go to once the user has been successful in logging in, and the URL that the app should return to once the user has logged out. I’ve created a quick S3 website to use with my Cognito new sign-in. For more information on these options please see: Specifying Identity Provider Settings for Your User Pool App in the Cognito developer guide.

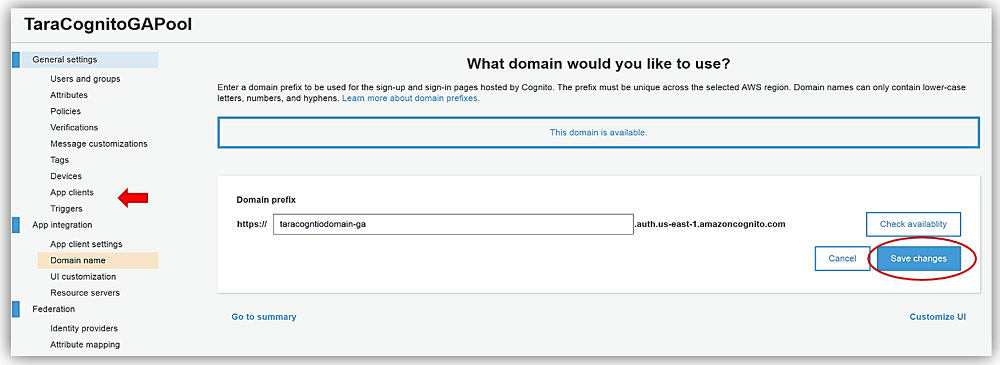
Now I’ll to go to the Domain name option under the App Integration tab, and I’ll enter a domain prefix to be used for my sign-up and sign-in pages hosted by Cognito. Keeping with my current naming convention, I’ll name my domain, taracognitodomain-ga, and click the Check Availability button. Remember your domain name must be unique across the chosen AWS region and can only contain lowercase letters, numbers, and hyphens. Since my domain name is available, I will click Save changes and go to UI customization settings.
UI customization settings is where I can change the look and feel of the default AWS UI hosted sign-in for a specific app client or as the default look for all my app clients. I’ll select the app client I created earlier and upload my personal logo to be displayed on my page. You should note that you can customize the CSS for several fields and HTML tags for your page as well by selecting the options under the CSS customizations (optional) section and adding your CSS as desired.

After selecting the Save Changes button, I can now view my login page, which I can use for by web and mobile app clients. The hosted UI for your Cognito User Pool can be accessed by using a URL with the following pattern:
Which would make my hosted URL as following (my client id is obfuscated):
Clicking on this link displays my custom sign-in and sign-up page hosted by AWS Cognito User Pools with my custom logo presented. How exciting!

We’re cooking with gas! But wait, I promised that I would discuss how to tie Federation and external federated identity providers to your Cognito User Pool. I’m sure you thought that I had forgotten. No worries, I’ll discuss Federation now.
Configuring Federation with a social and/or a SAML identity provider is pretty easy. With Cognito’s built-in integrations, you no longer have to integrate multiple identity provider SDKs or handle redirects or post backs in your app. Cognito handles the identity provider interactions for you and creates user profiles for federated users in Cognito User Pools.
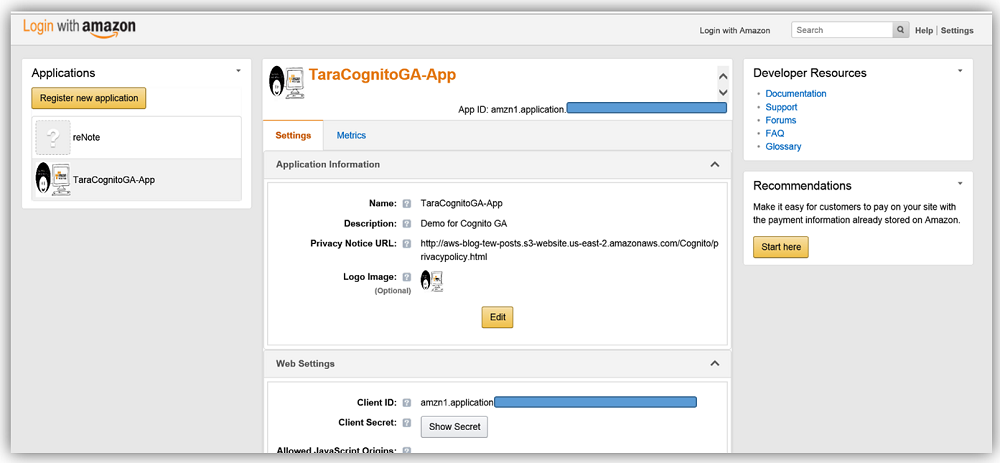
However, before I show you how to configure a Cognito Federated identity provider, I actually need one to show. Given this, I ran over to the Login with Amazon page and created an app so I can use it as one of my federated identity providers. Sure, I could have done Facebook or Google but everyone does those identity providers, and hey, we all need a little variety in our lives.
With my Login with Amazon app id and app secret in hand, I’ll return to the Cognito User Pool console and go to the Federation tab on the menu side bar. I’ll select the identity providers option, and here I am presented with all the identity providers supported for sign in with Cognito User Pools. Here I will select the Login with Amazon identity provider.

Now I will enter my app ID/client ID and app secret provided by the Login with Amazon service into the Amazon app ID and App secret fields. I also can determine what scopes and related data are authorized by this login. For this sample, I have chosen to enter profile, postal_code, and email in the Authorize scope field.
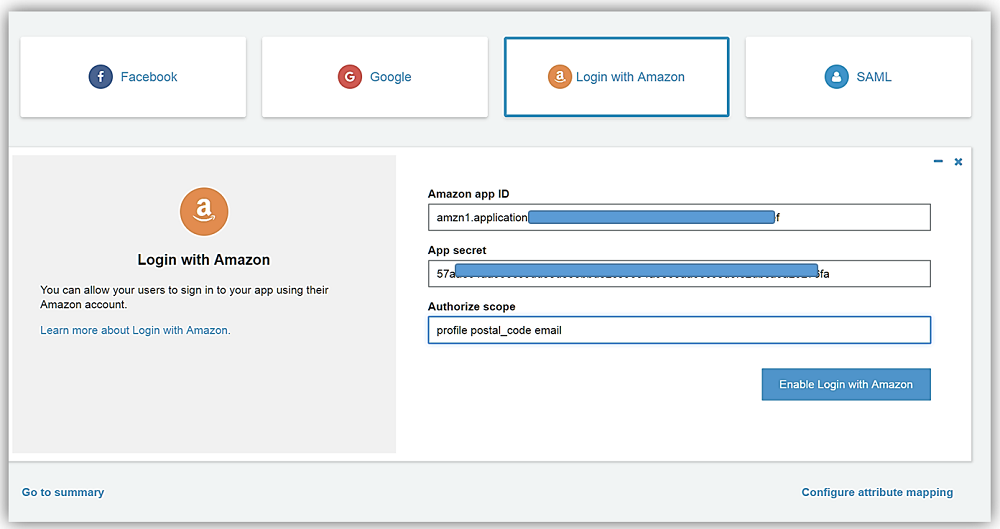
All that is left is for me to select the Enable Login with Amazon button, and I have successfully added the identity provider for the Login with Amazon identity service.

My final step is to go to the Attribute mapping section also under the Federation section. Here I will select the Amazon tab and map the Login with Amazon attributes to the attributes captured by Cognito User Pool. Once I hit that Save changes button, I have successfully added the Login with Amazon identity provider.

If I go back to App client settings and enable Login with Amazon provider by checking the provider related check box, and return to my Cognito UI hosted login page; I now see that Cognito has successfully added the Login with Amazon to my sign in page.

Summary
Fantastic! Now as a developer, I can focus on making my app experience as smooth and engaging as possible, including a simple, customized sign in process for my app users without the heavy lifting typically needed to implement a sign in screen with social and SAML identity providers.
AWS Cognito User Pools – App Integration and Federation enables web and mobile app developers to easily integrate and customize a user experience for users to sign-up and sign-in though AWS-hosted web pages. Additionally, it simplifies user management by providing a unified user authentication and authorization mechanism whether using Cognito User Pools as a user directory and/or other identity providers including Facebook, Google, Login with Amazon, as well as, corporate SAML providers like Microsoft Active Directory. Learn more about this great service by checking out the Amazon Cognito product page or the Amazon Cognito developer guide.
Enjoy!
– Tara